Windows for Hyper-V Deployment Tutorial
This document will guide you through deploying Nekro Agent on Windows systems.
Tips for first-time Hyper-V Quick Create users
- When quickly creating Ubuntu 22.04, do not check "Auto Login", choose "Password Login", otherwise enhanced session cannot be enabled for unknown reasons.
- Quick Create uses Azure Linux kernel, which does not support Hyper-V memory reclamation. The memory you set as maximum will be fully occupied. If you need memory reclamation, switch to Generic kernel.
- Remember to use disk management tools to enable the space allocated by Hyper-V expansion.
- Create more checkpoints before updating arbitrarily.
🌈 Environment Preparation
Since Nekro Agent runs based on Docker, we need to install Hyper-V on Windows first.
Installing Hyper-V
Enable Hyper-V to create virtual machines on Windows. Hyper-V can be enabled in multiple ways, including using Windows Control Panel, PowerShell, or using Deployment Image Servicing and Management (DISM). This document explains each option step by step.
Note
Hyper-V is built into Windows as an optional feature, no need to download Hyper-V.
Check Windows System Requirements
Windows 10 (Pro or Enterprise), or Windows 11 (Pro or Enterprise) 64-bit processor with Second Level Address Translation (SLAT). CPU supports VM Monitor Mode Extension (VT-c on Intel CPUs). Minimum memory of 4 GB.
Note
Hyper-V role cannot be installed on Windows 10 Home or Windows 11 Home using normal methods, please use installation script Note: The script needs to be run with administrator privileges.
For detailed information and troubleshooting, please refer to Windows Hyper-V system requirements.
Enable Hyper-V Using PowerShell
On the Windows desktop, select the "Start" button and type any part of the name Windows PowerShell.
Right-click Windows PowerShell and select "Run as administrator".
Warning
PowerShell must be run as an administrator, otherwise the command will fail.
- Run the following command:
Enable-WindowsOptionalFeature -Online -FeatureName Microsoft-Hyper-V -All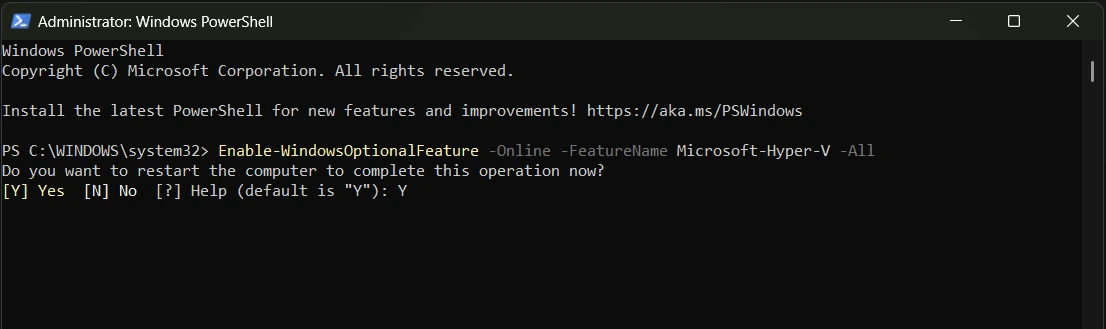
- Enter Y to let the computer restart to complete the installation.
Enable Hyper-V Using CMD and DISM
Deployment Image Servicing and Management (DISM) helps configure Windows and Windows images. Among its many applications, DISM can enable Windows features while the operating system is running.
To enable the Hyper-V role using DISM, follow these steps:
On the Windows desktop, select the "Start" button and type any part of the name Windows PowerShell.
Right-click Windows PowerShell and select "Run as administrator".
Type the following command:
DISM /Online /Enable-Feature /All /FeatureName:Microsoft-Hyper-V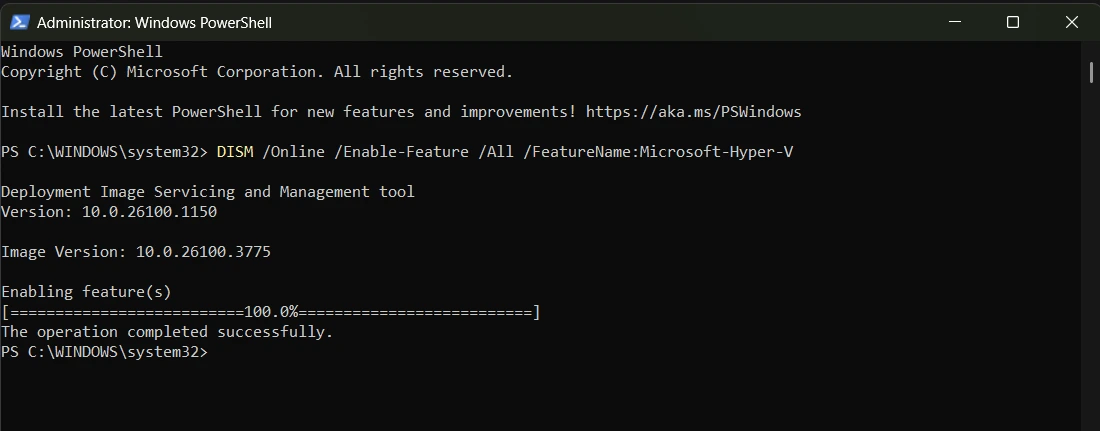
- You can see that the feature has been enabled and "The operation completed successfully".
Enable Hyper-V Role Through "Settings"
Select "Start", then search for and select "Settings"
Select "Apps" and "Features". Then select "Programs and Features"
Select "Turn Windows features on or off".
Select Hyper-V, then select "OK".
Restart your computer to complete the installation.
Enable Hyper-V on Windows 10 and Windows 11
Navigate to Control Panel. Select "Start", then search for Control Panel to open the application.
Select "Programs", then select "Programs and Features".
Select "Turn Windows features on or off".
Select Hyper-V, then select "OK".
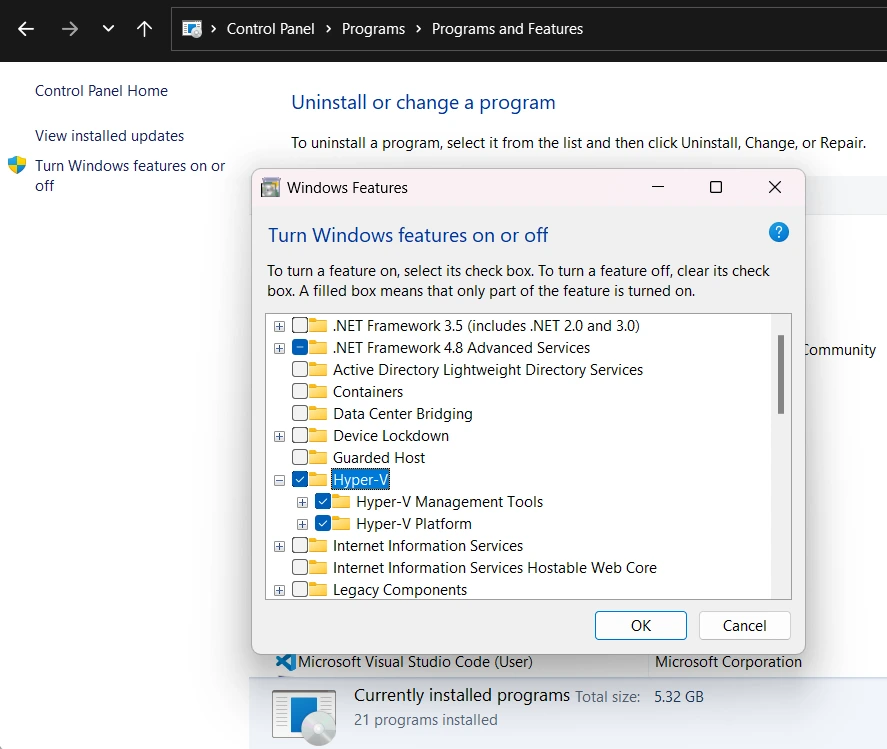
After installation is complete, the system will prompt you to restart your computer.
Install Linux Virtual Machine Using Hyper-V
Install Linux Virtual Machine
Open Hyper-V Manager. Select "Quick Create", then select Ubuntu 22.04 LTS
Select "Create Virtual Machine".
Wait for creation to complete, then start and set up the system
Install Nekro Agent
The steps to install Nekro Agent are consistent with Linux deployment. Please check the Linux Deployment document and complete the deployment according to the documentation.
Post-Deployment Configuration
Go to the Protocol Endpoint Configuration document and complete the configuration according to the documentation.